Happy 4th you guys....I hope everyone is doing well...I sincerely apologize for not posting anything in over TWO MONTHS!!!....wow..... I really miss you guys though ! and I miss blogging also. However I have totally changed my entire life around, I have become a TRUCK DRIVER! yes you read that correctly. A real "TRUCK DRIVER", and a cross country one at that.
(side note: I get to travel all over the US and get paid for it and visit states I have never seen), but I am never home, and when I am its only for a day or two if that. So lets just say I don't have a lot of time to blog, for now that is anyway. But I promise you I will return. Thanks to all my new readers who have joined my blog I really appreciate it I hope you have found it enjoyable thus far, and I am glad to have you. Please be patient with me as I enjoy my new life adventure! and promise I will return to blogging soon as I can. Who knows I might start blogging about the life of a FEMALE truck driver, cause lord knows I have seen alot. Stay tuned. and take care....... hugs:)
Thursday, July 4, 2013
Tuesday, April 23, 2013
Craigslist Table Makeover Part 1
FINALLY!!!.....FINALLY!!!!.....I have worked on this table while working a crazy work schedule, juggling family duties, and not feeling so good lately. But It is at a place that I can show you now with out covering my eyes. So with out further Ado.Here she is.
(Staged of course for viewing purposes only) once I get everything together and get back to feeling good I will decorate her with her own stuff, and not stuff ISTOLE borrowed from another part of the house.
I always like to show what it once looked liked first (just to build the suspense) ha ha!

And now the after.....

Picture over load...Get Ready


I made my own chalk paint. I still have to distress and wax her I just wanted to show you some of the progress. I still don't feel good so hopefully really soon I can get back to working on her. And the chairs also. Thanks for hanging in there with with me so far.
Stay tuned for her Part 2 Reveal. And the chair makeover.
Yours Truly,
Sharon
Partying over at:
http://www.savvysouthernstyle.net/2013/04/wow-us-wednesdays-115.html?utm_source=feedburner&utm_medium=email&utm_campaign=Feed%3A+SavvySouthernStyle+%28Savvy+Southern+Style%29
(Staged of course for viewing purposes only) once I get everything together and get back to feeling good I will decorate her with her own stuff, and not stuff I
I always like to show what it once looked liked first (just to build the suspense) ha ha!

And now the after.....

Picture over load...Get Ready


Stay tuned for her Part 2 Reveal. And the chair makeover.
Yours Truly,
Sharon
Partying over at:
http://www.savvysouthernstyle.net/2013/04/wow-us-wednesdays-115.html?utm_source=feedburner&utm_medium=email&utm_campaign=Feed%3A+SavvySouthernStyle+%28Savvy+Southern+Style%29
Wednesday, April 17, 2013
I would first like to say that my Prayers are with all those affected by the Boston Bombing. Another senseless act of PURE FOOLISHNESS. Weather we live there or not, or know someone that lives there, we are all affected and have been made to look closely at our lives. Love those around you dearly, and most of all love yourself.
Quick update....The Dining Room Table has been made over, I mean the dining room table has been painted. I still need to wax it before I show you......Patients...Patients! I know you are so excited to see it right? Well, I will tell you this. That FREAKING table kicked my "Pah-Tooty" Just know that! I have also been working on two end tables and a coffee table. I have been a Busy Bee up in here honey! Stay tuned Reveals are coming really soon. I promise. Oh! and a big hug and thank you to all my new readers
Yours Truly,
Sharon
Sunday, April 7, 2013
Desk Makeover For Real This Time!
Have you ever been working on a project and got right at the end of completing it and realized you didn't have what ever you may have needed to complete it? Or maybe you were trying to be money savvy and just didn't want to buy whatever it was you may have needed?
Well that's exactly what happened to me, But being patient has definitely paid off in a big way.
I showed you about a month ago my "Beach Office Reveal" and In that reveal was a desk I made over, and even though it was not finished I showed you anyway.
(I just love showing unfinished projects) HA! The knobs for my desk were the missing piece.
If you have ever remade a furniture piece and changed out the hardware, then you know yourself that hardware can get pricey. Especially when you need A LOT. And being the bargain shopper that I am, some THINGS I just REFUSE to pay a lot for. and that was one of those things.
Sooooo. I was browsing in Big lots Store the other day and came across some "awesomeness" let me just show you!

Yes! Yes! seashell Hardware. Now! was that just a perfect find or what? and being that it was a beach theme office makeover what could be more nautical then seashell hardware....whoop whoop!

The best part isn't just the fact that I came across "Seashell Hardware" Its that Four knobs came in a box for $2.50 Yes Honey you read that right Four knobs came in the box for a whole $2.50. And I needed a total of eighteen. Can you imagine what I would have paid for eighteen knobs from Lowe's or Home Depot? The price would have been outrageous.....

Just in case you care to see what It looked like in the very beginning here's a picture.

I Removed the top part...

And that's it folks another project checked off my list as "completed".
Have a great week and please come again.
Yours Truly,
Sharon
partying at:http://www.thevintagefarmhouse.com/2013/04/creative-things-thursday-link-party.html
Saturday, April 6, 2013
Update On Current Projects/ And Craigslist Finds
Hello All.... I hope your weekend is off to a great start. I just wanted to give you a quick update on what I have been doing and what projects I have been working on! (I love keeping you posted) I recently posted my Foyer or Entryway Reveal. (Which I happen to love)And no one can resist grabbing a handful of candy on the way out the door.
The Foyer was on my "TO DO LIST" of projects. But I wasn't at that time working on "The Foyer" per say. I was working on the basement. But as you may already know sometimes you might run across a piece of furniture for another project, And for whatever reason you just cant pass it up, Its a must grab type of situation! And you end up getting all side tracked (At least that's what ALWAYS happens to me ....HA!) So I ran across my entryway table and figured what the heck! might as well check that project off the list of To DO's. So I stopped production on the basement and worked on the foyer.In case you missed that post here's how it turned out.
 Link to the actual post IS HERE http://according2sharon.blogspot.com/2013/04/foyerenrtyway-reveal.html
So you may or may NOT know that I am currently working on making our basement a place we can actually enjoy and use as a family. And YES! it is a work in progress because it is a large area and money is tight. The hubby has agreed to let me decorate it on a super tight budget. Providing I can pull it off of course. And I gave him my word that I would thrift decorate mostly the whole thing. So I have been working on sections at a time. As not to get to over whelmed and OFF track. (Because Lord knows I can easily get off track HA! HA!) So, with that being said So far I have completed our office:


Partying at: http://www.thevintagefarmhouse.com/2013/04/creative-things-thursday-link-party.html
The Foyer was on my "TO DO LIST" of projects. But I wasn't at that time working on "The Foyer" per say. I was working on the basement. But as you may already know sometimes you might run across a piece of furniture for another project, And for whatever reason you just cant pass it up, Its a must grab type of situation! And you end up getting all side tracked (At least that's what ALWAYS happens to me ....HA!) So I ran across my entryway table and figured what the heck! might as well check that project off the list of To DO's. So I stopped production on the basement and worked on the foyer.In case you missed that post here's how it turned out.

So you may or may NOT know that I am currently working on making our basement a place we can actually enjoy and use as a family. And YES! it is a work in progress because it is a large area and money is tight. The hubby has agreed to let me decorate it on a super tight budget. Providing I can pull it off of course. And I gave him my word that I would thrift decorate mostly the whole thing. So I have been working on sections at a time. As not to get to over whelmed and OFF track. (Because Lord knows I can easily get off track HA! HA!) So, with that being said So far I have completed our office:

You can find the actual post here: http://according2sharon.blogspot.com/2013/03/beach-office-reveal.html
I have also completed my craft room/laundry room. Well actually the laundry side is still kind of under construction but its almost complete. Here's How it look so far.

You can view the actual Post here and see more pictures: http://according2sharon.blogspot.com/2013/03/craft-room-reveal.html
(Side Note:) Both office and craft/laundry room are located in the basement I am working from the far back corner to the front of the basement.
Then I moved on out to the main part of the basement area which is where I am currently working at this point, The next space that you come to after leaving the office area is the space where I will place my dining room(Large Family Gatherings are on the way) I have painted that entire area and here's where the new dining room will be:
And this is what the space recently looked like: Sorry for the horrible picture clarity
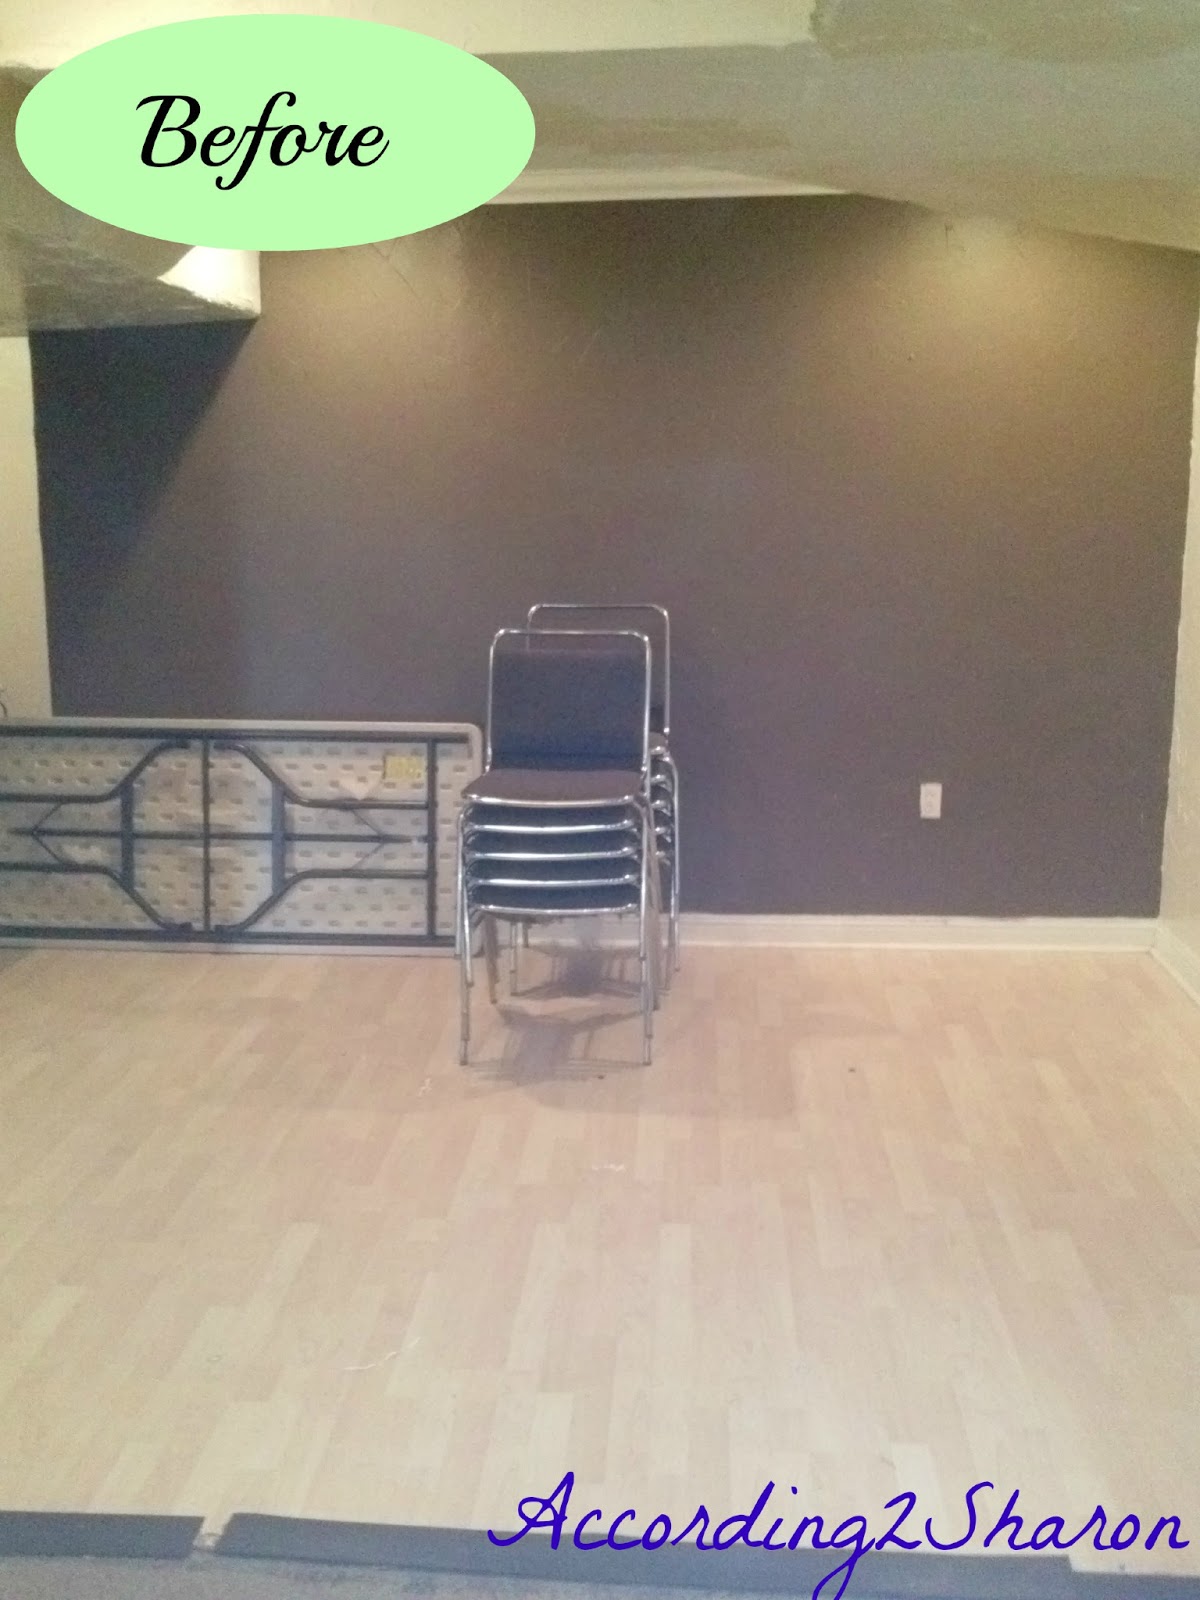
So in my quest of thrift decorating I had to find me a dining room table and chairs, So the search began. I checked all my local Goodwill stores, All the thrift stores in my area, and of course the Habitat Store. Which is were I hit the jack pot! I came across these chairs and snagged then for $4.oo each. (talk about excited).


I have already stripped them of their original look and painted them(Stay tuned for transformation)
Now that I have my chairs I needed a table that could seat at least six since that's how many chairs I have. So I turned to my old friend Craig~ Yep Craigslist. In case you didn't know I stalks the heck out of him HA! HA! almost daily. OK a couple times a day actually. I am obsessed!
But my stalking paid off because I found the mother load of all tables:

She seats ten, and has two leafs in the middle that I could take out if I chose. My poor brain has been all over the place since the moment I unloaded her off the truck with ideas of how to paint her and what color or finish she will be. I am yet again over whelmed with excitement. I paid $80.00 for this grand ole girl. The guy had ten chairs that came with it but I had no room for ten chairs, I didn't even want to temp myself so I told him to keep them.
We negotiated on this girl back and forth for a whole week. Guess who won???? (smiling)
Is It just me or do you get plum excited when you get a new piece of furniture to makeover?
Please stay tuned for the total transformation of my "Furniture Finds" and the basement makeover as I continue to move from section to section until she is all done.
That's my update folks, That's my story and I'm sticking to it.
I am happily working on my table and chairs on this lovely Saturday morning.
Have a great weekend, and come back real soon now.
Yours Truly,
Sharon
Partying at: http://www.thevintagefarmhouse.com/2013/04/creative-things-thursday-link-party.html
Monday, April 1, 2013
Foyer " Reveal"
Happy late Easter! If you had anything near the kind of Easter I had then you are either at a gym working out! or your Tummy still feels like someone stuffed a car in it....HA!
And if you are feeling OK! then you shouldn't have a problem reading this post :)
This Reveal actually should have been one of the very FIRST areas that I should have worked on in my home. ( shame on me) Duhhh! its the first area you see upon entering my home.
Its the area that should make your visitors or family feel welcomed into your home or in my case make them feel like maybe they shouldcome back another day! NO! I'm just kidding. But it should be welcoming and friendly. Needless to say my area was lacking all of the above. But alas I have fixed that problem honey! And It was done on a budget.
Side note:
I know your suppose to show your finished project first and blah! blah!blah! but this is one of those projects that must be done the right way. I want to build you up to the reveal so lets look at what it looked like about an hour ago.( Warning: Picture Over Load)

This Foyer isn't a big area but it doesn't have to look so Blah and cold either.
(I was slacking on the job here) I know!
Here come the excuses.....
Besides I had to wait to find the right piece that would fit in that area that didn't take up walking space, It couldn't be bulky, or two wide, or to tall, you get what
I'm saying? (laughing at all my excuses)
I came across the PERFECT, I mean PERFECT size piece and here's what it looked like.

Notice on the piece I had began painting before I realized I hadn't taken a before picture
(Naughty Girl Sharon) So I put down the brush and took this picture. Ya ll know I gets way to excited for my own good when I'm working on something. So my apologies! :)
About the Paint: I wanted a chalk/milk/white washed looked for this piece.(Can one have all those looks at one time???? hum!) Well I wanted all of them so I mixed my own paints Like a Lowe's paint mixer and to my surprise It came out exactly how I wanted it too. I was surprised of course and prepared at the same time to redo this piece just in case It was a Fail.


 Candy Bowl was $5.99
Wooden Seahorse $.5.00
Total Roughly $30.00


Rug was $7.00
 I replaced the hardware that was on it for these cute little leaves from Lowes. Cost $2.25 each
And there you have it Folks an entry way that I am now proud of, Come on over have you a piece of candy and stay a while!

Partying over at:http://www.thevintagefarmhouse.com/2013/04/creative-things-thursday-link-party.html
And if you are feeling OK! then you shouldn't have a problem reading this post :)
This Reveal actually should have been one of the very FIRST areas that I should have worked on in my home. ( shame on me) Duhhh! its the first area you see upon entering my home.
Its the area that should make your visitors or family feel welcomed into your home or in my case make them feel like maybe they should
Side note:
I know your suppose to show your finished project first and blah! blah!blah! but this is one of those projects that must be done the right way. I want to build you up to the reveal so lets look at what it looked like about an hour ago.( Warning: Picture Over Load)

This Foyer isn't a big area but it doesn't have to look so Blah and cold either.
(I was slacking on the job here) I know!
Here come the excuses.....
Besides I had to wait to find the right piece that would fit in that area that didn't take up walking space, It couldn't be bulky, or two wide, or to tall, you get what
I'm saying? (laughing at all my excuses)
I came across the PERFECT, I mean PERFECT size piece and here's what it looked like.

Notice on the piece I had began painting before I realized I hadn't taken a before picture
(Naughty Girl Sharon) So I put down the brush and took this picture. Ya ll know I gets way to excited for my own good when I'm working on something. So my apologies! :)
About the Paint: I wanted a chalk/milk/white washed looked for this piece.(Can one have all those looks at one time???? hum!) Well I wanted all of them so I mixed my own paints Like a Lowe's paint mixer and to my surprise It came out exactly how I wanted it too. I was surprised of course and prepared at the same time to redo this piece just in case It was a Fail.

I then took a little trip over to two of my favorite store so that I could deck this sassy mama out!
Home Goods and Ross to be exact
and here's what I found for little to nothing.


Owl was $2.50
Orange Vase $7.00 (has a small chip in the back)
Round Woven Glass Vase was $9.00
Total so far: $18.50

Wooden Seahorse $.5.00
Total Roughly $30.00


Rug was $7.00

And there you have it Folks an entry way that I am now proud of, Come on over have you a piece of candy and stay a while!

Now back to our regular scheduled PROJECTS in progress the
BASEMENT........ whewww!
Thanks for stopping by, Come back real soon now!
Yours Truly,
Sharon
Partying over at:http://www.thevintagefarmhouse.com/2013/04/creative-things-thursday-link-party.html
Sunday, March 24, 2013
Art Work (Painted by my daughter Shan)
This is a must share moment! I am so proud and excited to share with you a painting my daughter painted for me two days ago. She has been drawing every since she could hold a crayon, and now at almost 21 years old she has blossomed into a very very good artist and truly has a passion for art.
She is so busy with her new baby," my sweet grandson" I couldn't believe she could even find the time to work on it. So with out further ado let me just show you.


She is so busy with her new baby," my sweet grandson" I couldn't believe she could even find the time to work on it. So with out further ado let me just show you.

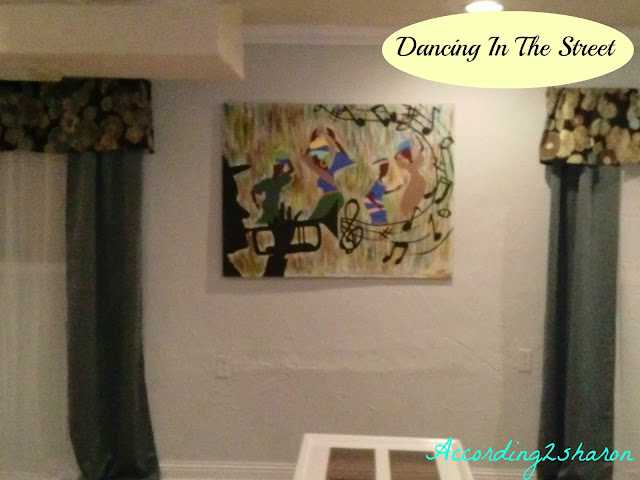
She calls it dancing in the streets!

Of course this painting has found a home in the basement which happens to be the area I'm making over at the moment, so it was perfect for this wall. And I was so pleased.
(side note: Those curtains have been removed and put up stairs in the kitchen)
They just didn't work for me in this space

On one of my many trips to the Acmoore Craft store that's going out of business not to far from where I live I came across this canvas on sale for $22.00.

And for this size I couldn't pass it up

Pretty large huh?
she has painted two others for me that I have in my bedroom , they were also featured in several contest here in town where she won 1st and 2nd place.
Let me show you ( Bonus Pictures) I'm just a proud Mama right now. (You moms understand!!!)


How she managed to find the time between washing baby bottles, Feeding baby, and all her other motherly duties I will never know...... But I sure am proud of the woman she has become
Meet The little guy that has completely stole my heart away.

Thanks for joining me in my proud mama moment!
Have a great rest of the weekend and please come back soon now.....
Yours Truly,
Sharon
Saturday, March 23, 2013
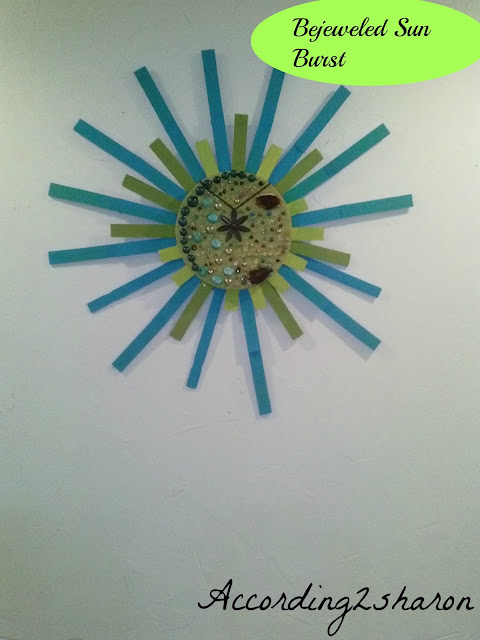
DIY Sun Burst (Using Shims)
Its called project over load or is it Saturday boredom? Whatever it may be I have been up in here busy being as crafty as I know how to be today(shopping in my own home). Decorating is so much fun (wouldn't you agree?) and when you can create projects for little or no money that makes it even more fun. Right? Since I'm on this serious mission decorating my basement I am always, I repeat always searching for neat Ideas to make my own, In my last post I made a sun burst out of poster board, And I liked it so much I decided I would create another one. Except this time I used wood shims and a little something special, that's near and dear to my heart (jewelry).
Lets take a look at how this one turned out:

I used some old jewelry that I wasn't going to wear anymore, But didn't want to part with just yet.
(I just love my jewelry even if I'm not wearing it) alone with some random beads I had from my jewelry making.
What I like most about the sun burst in general is how much space it takes up,(you can make it as large or as small and you choose) I like it BIG! It also comes in handy when you have a fairly large wall you want to cover.

I really like the jewelry part and since I already made one with a mirror I thought this would be a neat idea, plus I hadn't seen one quite like this one yet, And I love it.


Here's how I made this bedazzled beauty!
1. I Gathered all the things I thought I would need. Of course along the way I changed some things out. (You know how projects sometimes take a turn!!!!!)

2. I then cut out a circle in the cardboard to use as the back of my sun burst and the part I would attach the shims too to create the sun burst. I then gathered my shims into piles according to length.

3. (side note) I attached two shims together to get longer lengths (used a glue gun of course)
Now its time to paint my shims.

4. Then I began attaching the shims to the cardboard: I filled in the spaces until I had a complete circle with my desired lengths using the longest first then the next length then I attached the shortest last.

5. I used a lid from one of those plain boxes that I purchased from ACmoore
(like the ones I decorated for storage in my craft room) I have so many it crazy! I just used one and covered it with fabric first. Then I began embellishing it with Jewels.

Once I had it like I wanted, I then hot glued the whole thing right on top of the shims let dry and placed on the wall in my up and coming dining room. (stay tuned for that also)
It was simple, easy, and free because I had everything already! (Now I cantbeat that with a stick)
I'm linking up at:
http://www.savvysouthernstyle.net/
Lets take a look at how this one turned out:

I used some old jewelry that I wasn't going to wear anymore, But didn't want to part with just yet.
(I just love my jewelry even if I'm not wearing it) alone with some random beads I had from my jewelry making.
What I like most about the sun burst in general is how much space it takes up,(you can make it as large or as small and you choose) I like it BIG! It also comes in handy when you have a fairly large wall you want to cover.


Here's how I made this bedazzled beauty!
SUPER EASY INSTRUCTIONS:
1. I Gathered all the things I thought I would need. Of course along the way I changed some things out. (You know how projects sometimes take a turn!!!!!)

2. I then cut out a circle in the cardboard to use as the back of my sun burst and the part I would attach the shims too to create the sun burst. I then gathered my shims into piles according to length.

3. (side note) I attached two shims together to get longer lengths (used a glue gun of course)
Now its time to paint my shims.

4. Then I began attaching the shims to the cardboard: I filled in the spaces until I had a complete circle with my desired lengths using the longest first then the next length then I attached the shortest last.

5. I used a lid from one of those plain boxes that I purchased from ACmoore
(like the ones I decorated for storage in my craft room) I have so many it crazy! I just used one and covered it with fabric first. Then I began embellishing it with Jewels.

Once I had it like I wanted, I then hot glued the whole thing right on top of the shims let dry and placed on the wall in my up and coming dining room. (stay tuned for that also)
It was simple, easy, and free because I had everything already! (Now I cant

Thanks for stopping by as always, Feel free to look around the blog at older post if you haven't already and please come again soon.
Yours Truly,
Sharon
I'm linking up at:
http://www.savvysouthernstyle.net/
Subscribe to:
Posts (Atom)